DIY Vanilla Wafers
Even better than the cookies from a box!
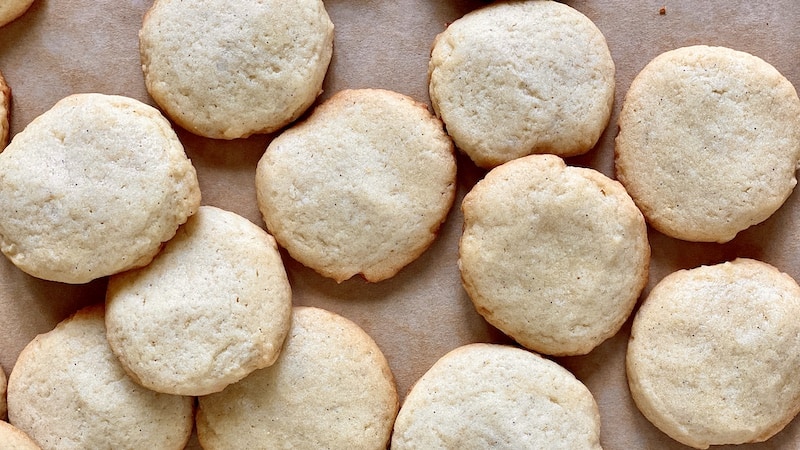
Did you know that vanilla wafers do not need to come from a box? It’s true! Vanilla wafers are simple cookies that, like many baked goods, are even better when they’re homemade. These homemade vanilla wafers are petite, crisp, and bursting with a vanilla flavor that the store-bought version cannot compete with. Here’s how to make better-than-the-box DIY vanilla wafers.
Vanilla bean paste vs. vanilla extract
For this recipe, I recommend using vanilla bean paste — you can see the little flecks of vanilla in the baked cookies!
Vanilla bean paste is a mixture of the vanilla bean seeds and vanilla extract combined with some sugar and a thickener to give it a thicker consistency. This ingredient is ideal when you want to highlight the vanilla flavor and see the natural flecks of vanilla bean seeds in the finished product.
Vanilla extract is made by steeping vanilla beans in alcohol and sometimes water. (Yes, it’s that easy to make your own vanilla extract.) When buying extracts at the store, make sure you choose pure vanilla extract over imitation vanilla extract for the best flavor.
What to do with vanilla wafers (besides eat them!)
Any time you might reach for that big yellow box with red writing, you can use these homemade vanilla wafers instead.
- Make banana pudding. Vanilla wafers and banana pudding are a classic combination that is made even better with homemade vanilla wafers. You can also make these banana pudding-inspired bars or ice cream pie.
- Make a crust. Use these cookies in place of graham crackers for crumb crusts.
- Assemble a dessert board. Add them to a platter filled with fruit, marshmallows, pretzels and cubed cake for dipping in chocolate fondue.
- Sandwich them. Whip up a batch of lemon curd or chocolate ganache to sandwich between a pair of vanilla wafers.
- Use as a substitute. Recipes that call for pound cake or ladyfingers may work well with vanilla wafers, including Lemon Curd Pudding and this show-stopping Berry Trifle.
How long do DIY vanilla wafers last?
You can keep vanilla wafers in an airtight container at room temperature for up to five days (if they last that long!). You can also freeze the baked wafers for up to one month or unbaked dough for two months.
DIY Vanilla Wafers
Makes about 75 (1-inch) cookies
Ingredients:
- 8 tablespoons (1 stick) unsalted butter
- 1 large egg
- 1 1/2 cups all-purpose flour
- 3/4 teaspoon baking powder
- 1/2 cup powdered sugar
- 1/4 cup granulated sugar
- 3/4 teaspoon kosher salt
- 1 tablespoon vanilla bean paste or vanilla extract
- 1 tablespoon whole milk or heavy cream
Directions:
- Place 1 stick unsalted butter in the bowl of a stand mixer (or large bowl if using an electric hand mixer). Place 1 large egg on the counter. Let both sit at room temperature until the butter is softened. Meanwhile, place 1 1/2 cups all-purpose flour and 3/4 teaspoon baking powder in a medium bowl and whisk to combine.
- Add 1/2 cup powdered sugar, 1/4 cup granulated sugar, and 3/4 teaspoon kosher salt to the bowl of butter. Beat with the paddle attachment on medium speed until lightened in color and fluffy, about 4 minutes. Scrape down the sides of the bowl and the paddle.
- Add the egg, 1 tablespoon vanilla bean paste or vanilla extract, and 1 tablespoon milk or cream and beat on medium speed until combined, 30 seconds to 1 minute.
- With the mixer on the lowest speed, gradually add the flour mixture and beat just until combined with no streaks of flour remaining, about 1 minute total.
- Refrigerate the dough for 15 minutes. Meanwhile, arrange two racks to divide the oven into thirds and heat the oven to 350 F. Line 2 rimmed baking sheets with silicone baking mats or parchment paper.
- Scoop out the dough with a 1/4-ounce scoop into about 40 portions (about 1 teaspoon each). Place on the baking sheets, spacing them evenly apart, about 20 per baking sheet. Wet your fingers and gently flatten each cookie dough ball until 1-inch wide and 1/4-inch thick.
- Bake for 6 minutes. Rotate the baking sheets between racks and from front to back. Bake until the cookies are light golden brown around the edges, 4 to 6 minutes more. Refrigerate the remaining dough while the cookies bake.
- Let the cookies cool on the baking sheets for 5 minutes. Transfer to a wire rack and let cool completely. Repeat baking the remaining dough on cooled baking sheets (you can reuse the parchment).
Recipe note
To make ahead: Freeze flattened cookie dough balls until solid on the baking sheet, then store in a zip top bag for up to two months. The cookies can be baked from frozen and will take 1 to 2 minutes longer after the baking sheets are rotated.
Patty Catalano is a contributor to TheKitchn.com, a nationally known blog for people who love food and home cooking. Submit any comments or questions to editorial@thekitchn.com.
©2022 Apartment Therapy. Distributed by Tribune Content Agency, LLC.